
Skip to Content
EFixPro
  • ERP modules
    • Commerce
    • POS Retail Retail POS
    • CRM CRM
    • sales Sales
    • Subscriptions Subscriptions
    • View all
    • Supply chain
    • Inventory Inventory
    • Purchasing Purchases
    • Manufacturing Manufacturing
    • Products Products
    • Repairs Repairs
    • View all
    • Finance
    • Accounting Accounting
    • Electronic Payroll Electronic payroll
    • electronic invoicing Electronic invoicing
    • Expenses Expenses
    • Documents Documents
    • View all
    • HR
    • Calendar Calendar
    • Employees Employees
    • Projects Projects
    • Helpdesk Helpdesk
    • Contacts Contacts
    • View all
    • Marketing
    • Website Websites
    • Email Marketing Email marketing
    • Events Events
    • Live Chat Live chat
    • Blog Builder Blog builder
    • View all
    • Industries
    • Restaurants and cafés
    • Retail and specialty stores
    • Technical services
    • Construction and maintenance
    • Hospitality and tourism
    • Bakeries and pastry shops
    • View all
    Commerce
    • restaurant-pos Restaurant POS
    • POS Retail Retail POS
    • CRM CRM
    • sales Sales
    • Subscriptions Subscriptions
    • View all
    Supply chain
    • Inventory Inventory
    • Purchasing Purchases
    • Manufacturing Manufacturing
    • Products Products
    • Repairs Repairs
    • View all
    Finance
    • Accounting Accounting
    • Electronic Payroll Electronic payroll
    • electronic invoicing Electronic invoicing
    • Expenses Expenses
    • Documents Documents
    • View all
    HR
    • Calendar Calendar
    • Employees Employees
    • Projects Projects
    • Helpdesk Helpdesk
    • Contacts Contacts
    • View all
    Marketing
    • Website Websites
    • Email Marketing Email marketing
    • Events Events
    • Live Chat Live chat
    • Blog Builder Blog builder
    • View all
    Industries
    • Restaurants and cafés
    • Retail and specialty stores
    • Technical services
    • Construction and maintenance
    • Hospitality and tourism
    • Bakeries and pastry shops
    • View all

    • Contact us
    • ​ Book a sales consultation
    • Live chat
  • EDUCATION
  • Industries
    • Restaurants and cafés
    • Retail and distribution
    • Technical services
  • ABOUT US
    • OUR COMPANY
    • SUCCESS STORIES
  • CONTACT US
    • Support

    • Service appointments
    • Group training (level 1)
    • Personalized session (non-accounting)
    • Accounting consultation
  • 0
  • 0
  • English (US) Español (CO)
  • Sign in
  • Book a sales consultation
EFixPro
  • 0
  • 0
    • ERP modules
    • EDUCATION
    • Industries
      • Restaurants and cafés
      • Retail and distribution
      • Technical services
    • ABOUT US
      • OUR COMPANY
      • SUCCESS STORIES
    • CONTACT US
      • Support
      • Service appointments
      • Group training (level 1)
      • Personalized session (non-accounting)
      • Accounting consultation
  • Book a sales consultation
  • English (US) Español (CO)
  • Sign in

How to create a basic product

Learn to create a basic storable product in Odoo 17 with our step-by-step guide. Optimize inventory and manage products efficiently in Odoo.
  • All Blogs
  • V17 tutorials
  • How to create a basic product
  • September 24, 2024 by
    How to create a basic product
    TORRES PARRA DAVID FERNANDO

    In this tutorial, we will learn to create a basic storable product in Odoo 17. This process is essential for efficient inventory management and correct product records. Follow these steps to add a new product to inventory. 

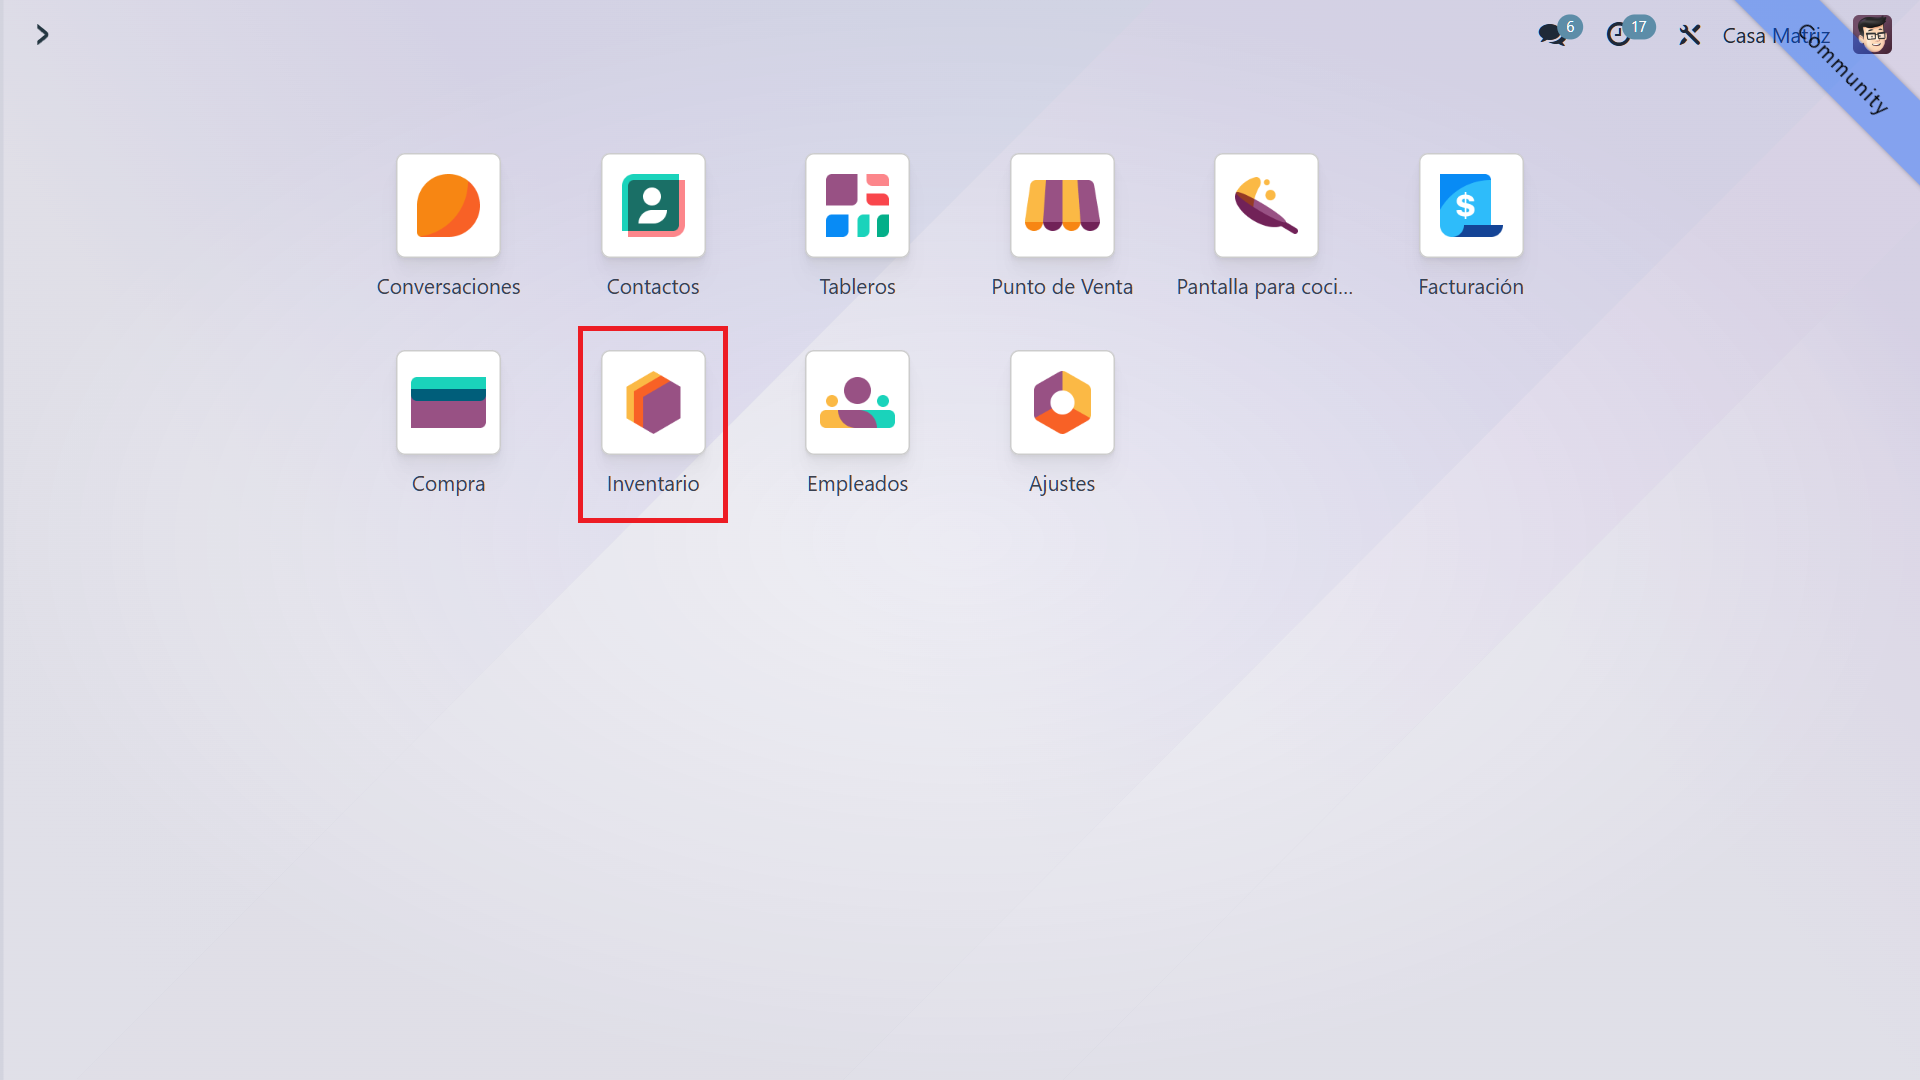
    1. Inventory module in the main menu 

    In the Odoo main menu, select "Inventory". This module lets you manage all aspects of your company's inventory.
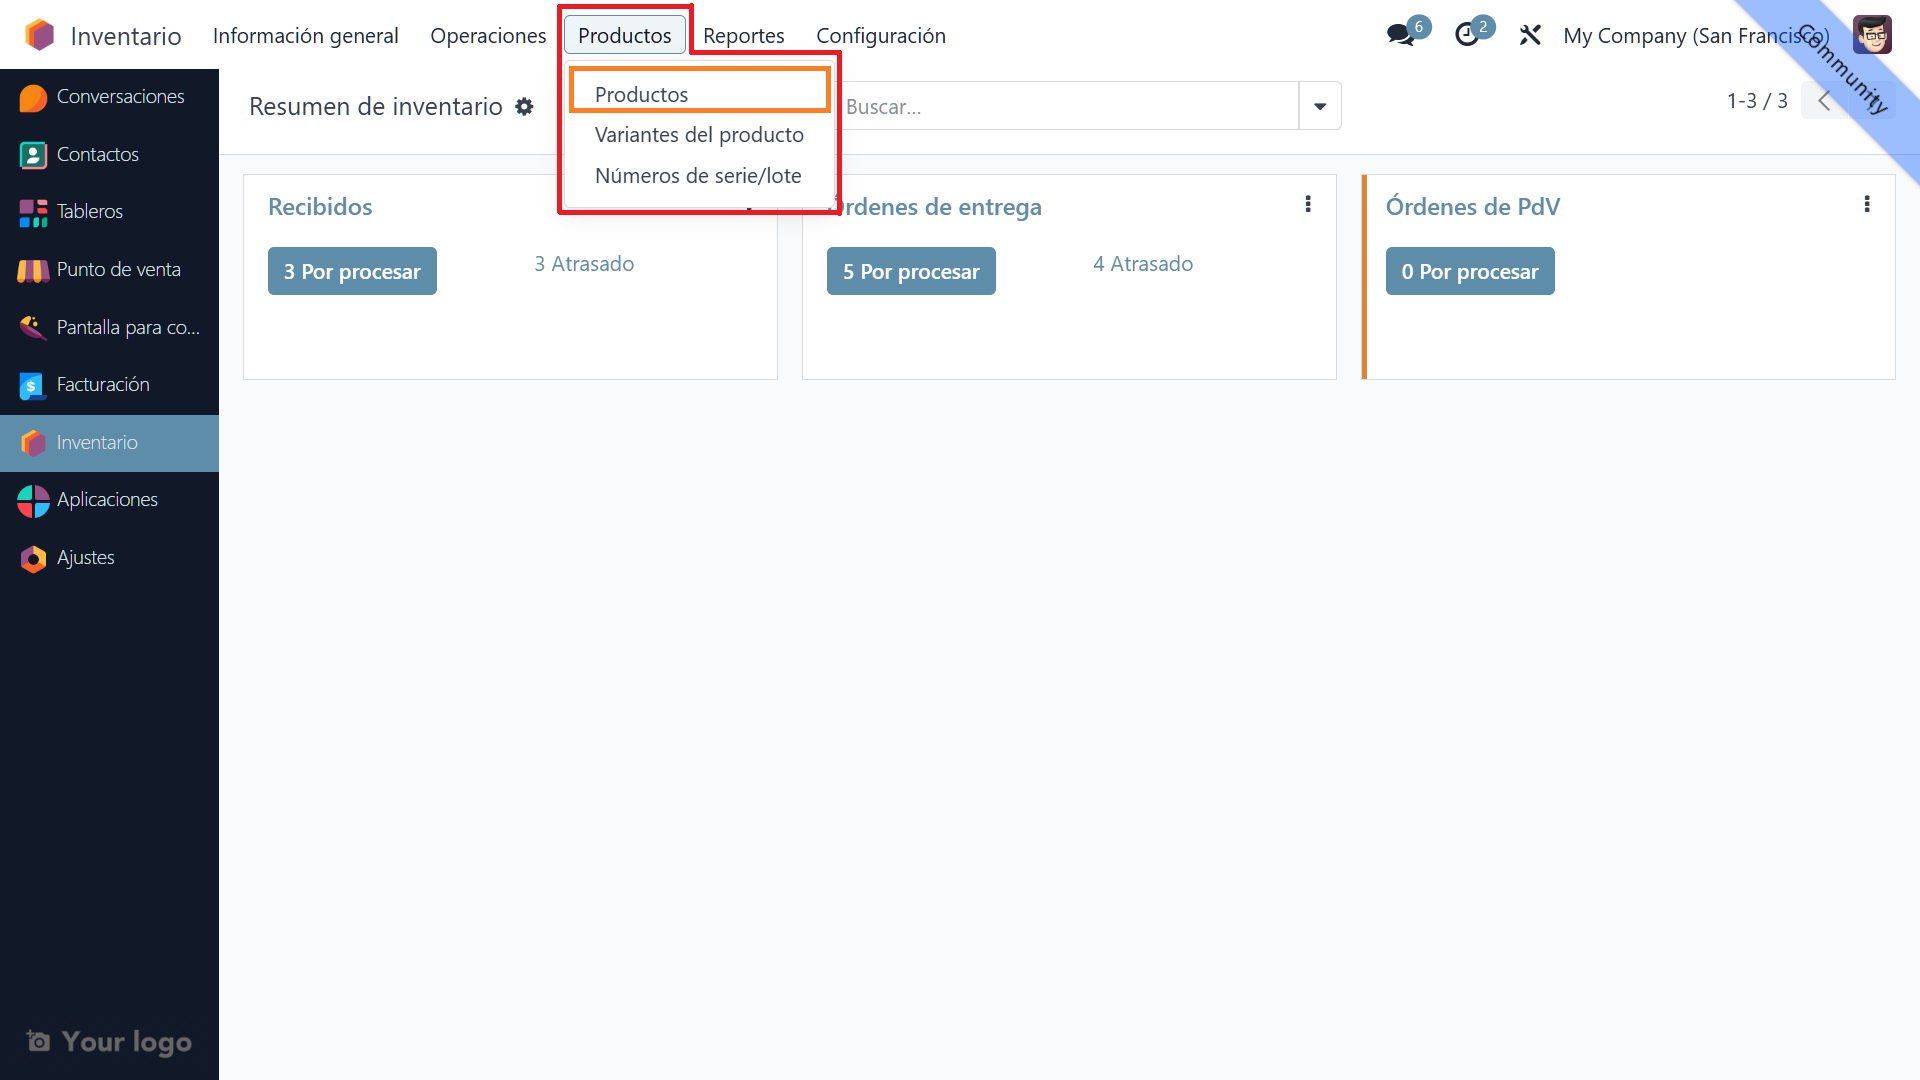
    2. "Products" in the top menu, then "Products" 

    At the top of the Inventory module, click "Products", then select "Products". You will see a list of all existing products.
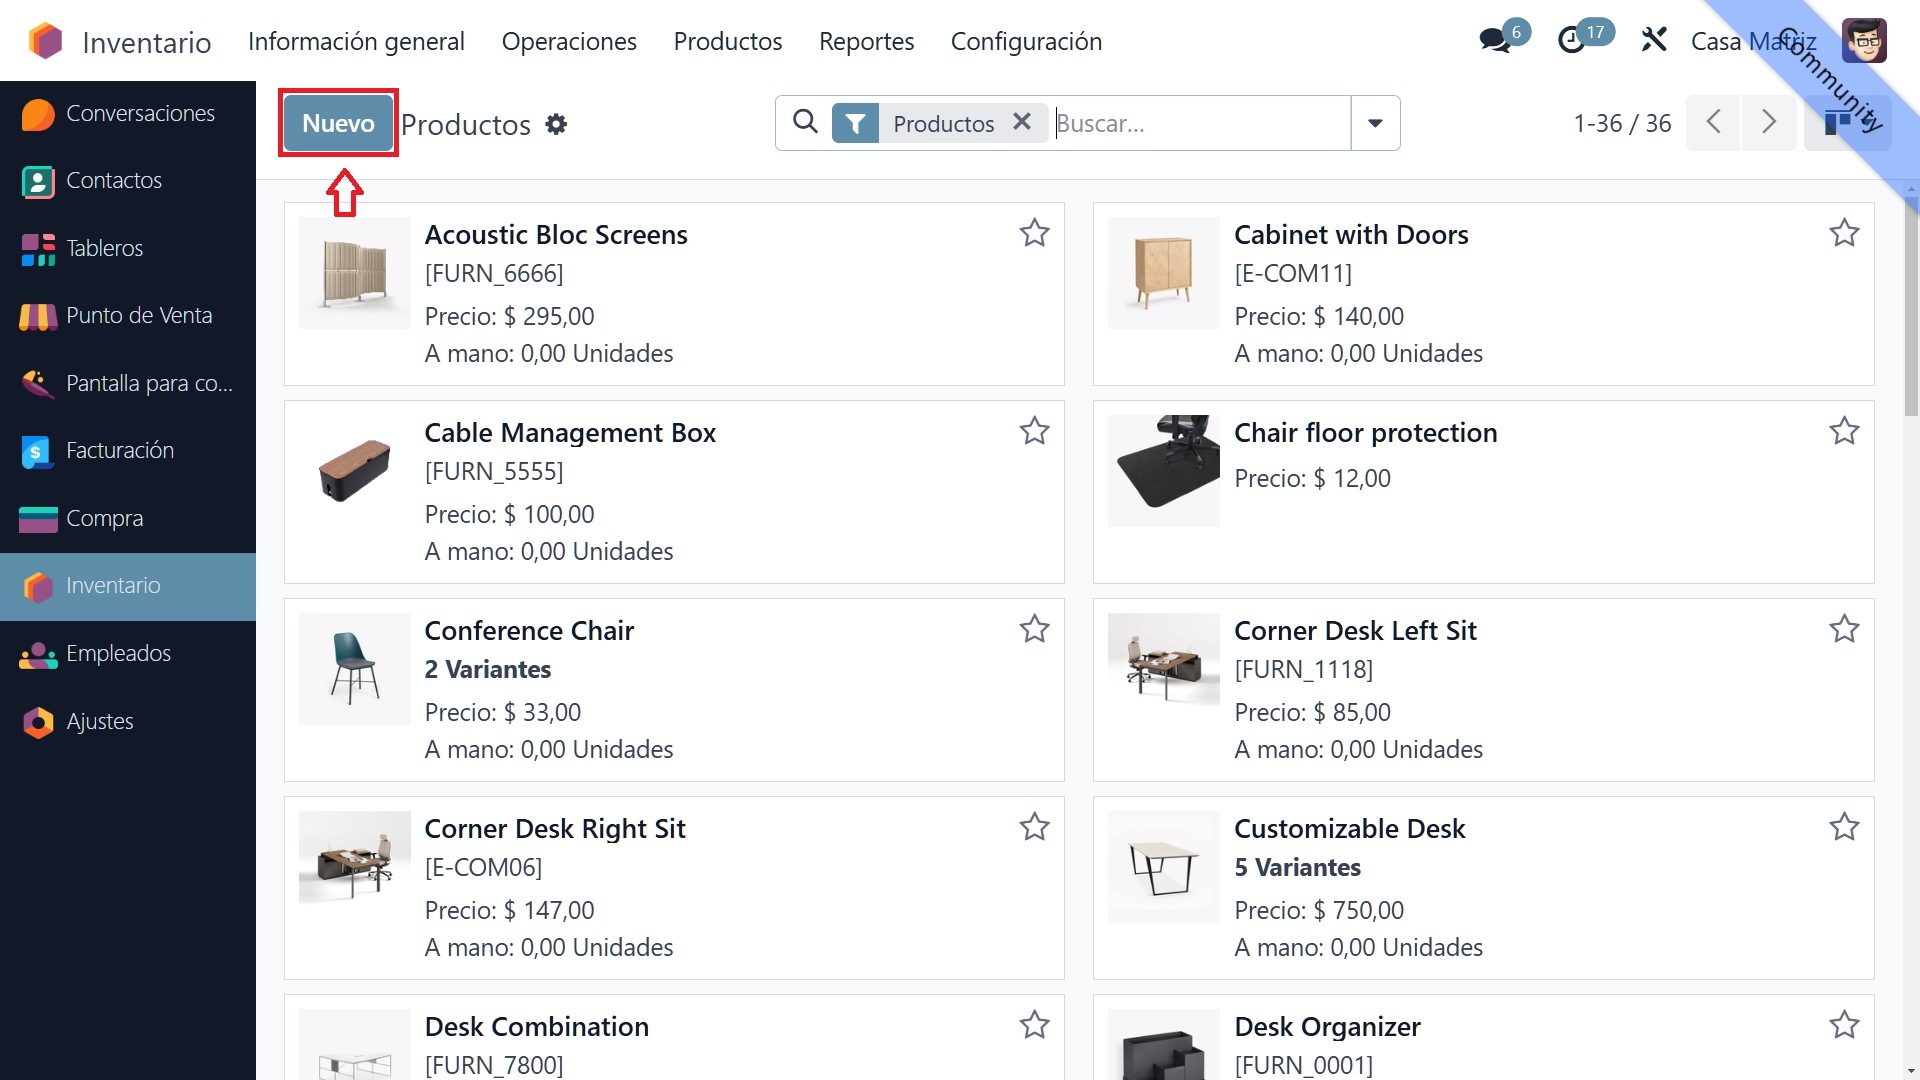
    3. The "New" button 

    To create a product, click "New" at the top of the screen. A form opens where you can enter the new product details.
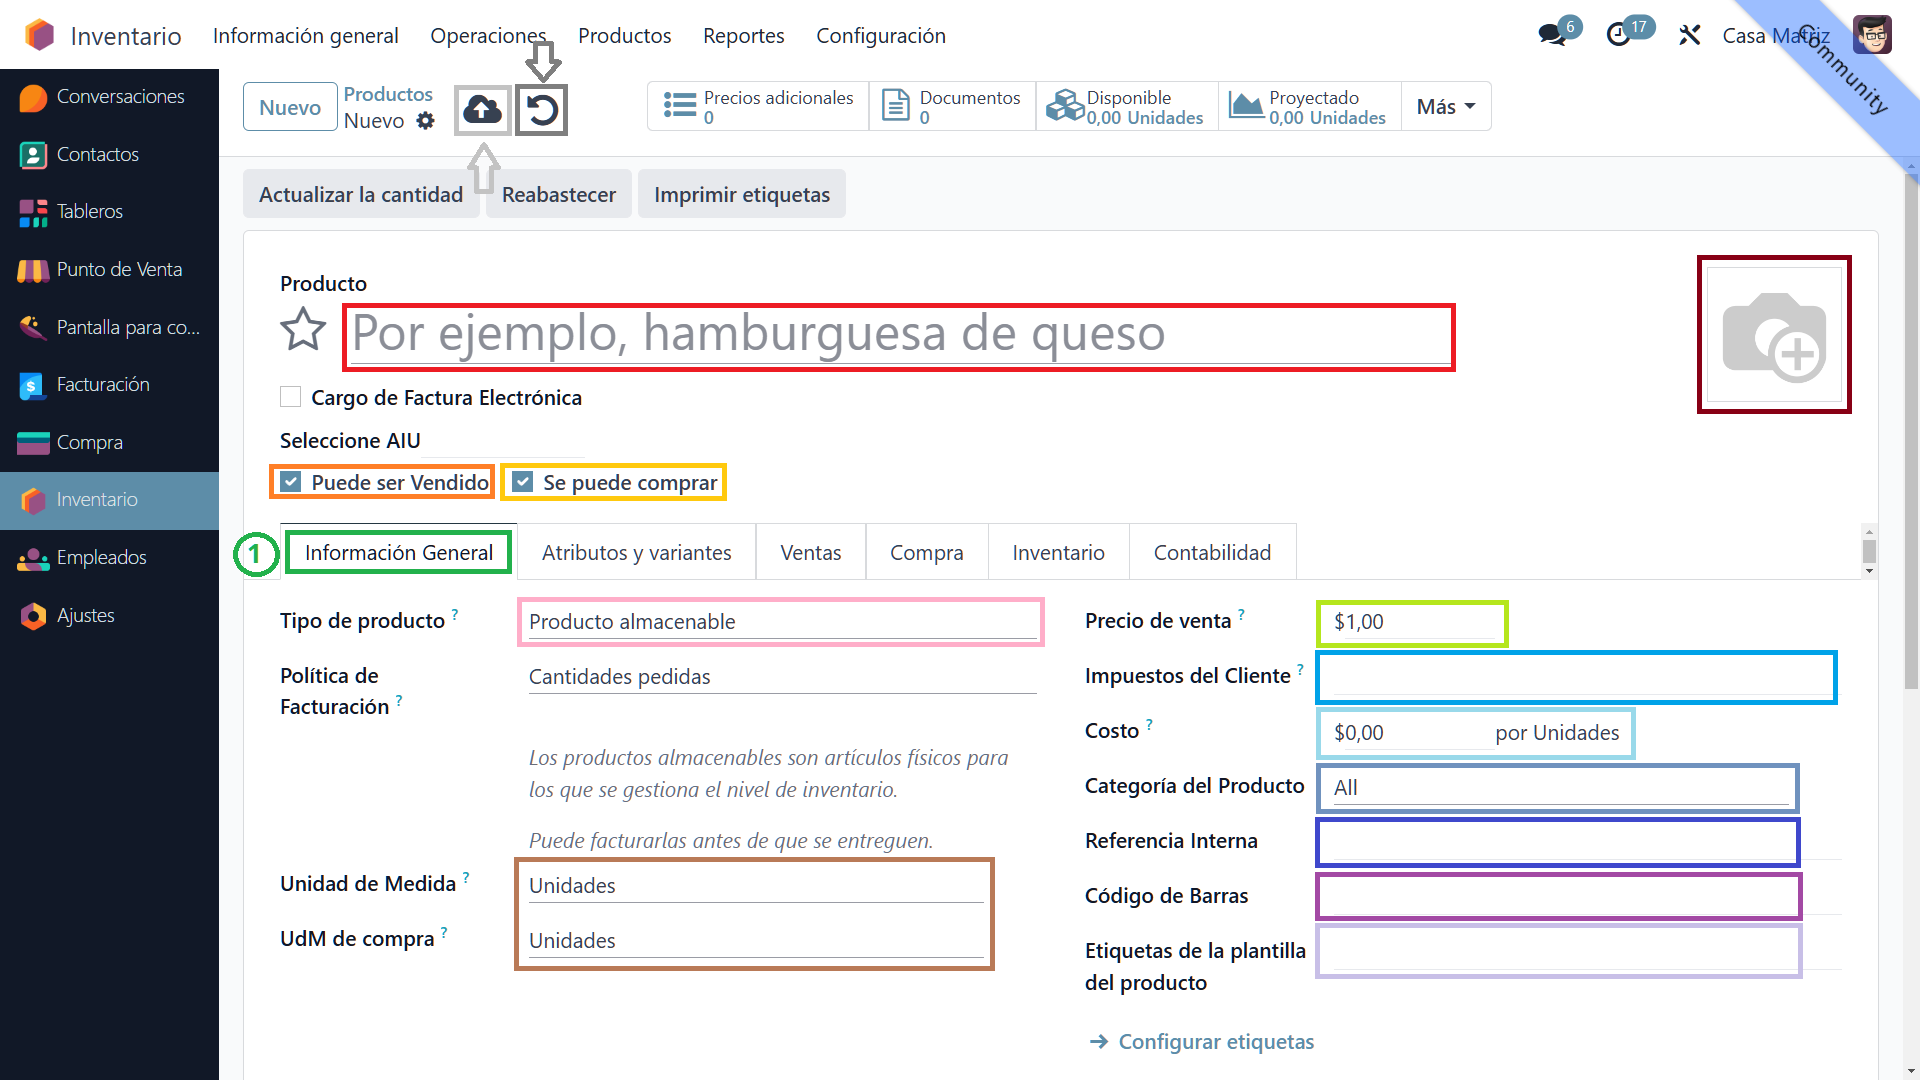
    4. Enter "General Information" 

    In this section, enter the product's general details: 

    • Name: Enter the product name.
    • Can be sold: Select this option if you need the product to be visible in the Point of Sale interface.
    • Can be purchased: Select this option if the product can be purchased.
    • Product type: Select "Storable Product". As this is a basic product, we assume it is purchased from a vendor and eventually sold to customers through the Point of Sale interface
    • Sales and purchase unit of measure: Choose the corresponding sales and purchase units. Point of Sale offers units such as "Units", "Kilograms", "Liters", "Ounces" and many others. Select the one that best suits your product
    • Sales price: Enter the price at which the product will be sold. This is the final price assigned for sales to consumers
    • Customer taxes: Select the taxes applicable to customers. If you need to enter a specific tax, contact our support team to configure it.
    • Cost: Enter the product cost, meaning its purchase value in the selected unit of measure.
    • Product category: Assign a category. This is usually a term associated with this product and others. Adding a category is important for reports and future purchasing actions. For example, a carbonated drink could belong to "Beverages"
    • Internal reference: Enter an internal reference if the product has one. Although optional, we recommend adding it for future product updates
    • Barcode: If the product has a barcode, enter it here. Like the internal reference, this field is optional, but we recommend a unique barcode or the product's default barcode
    • Product photo: At the top right, add a photo by clicking the pencil-shaped button.

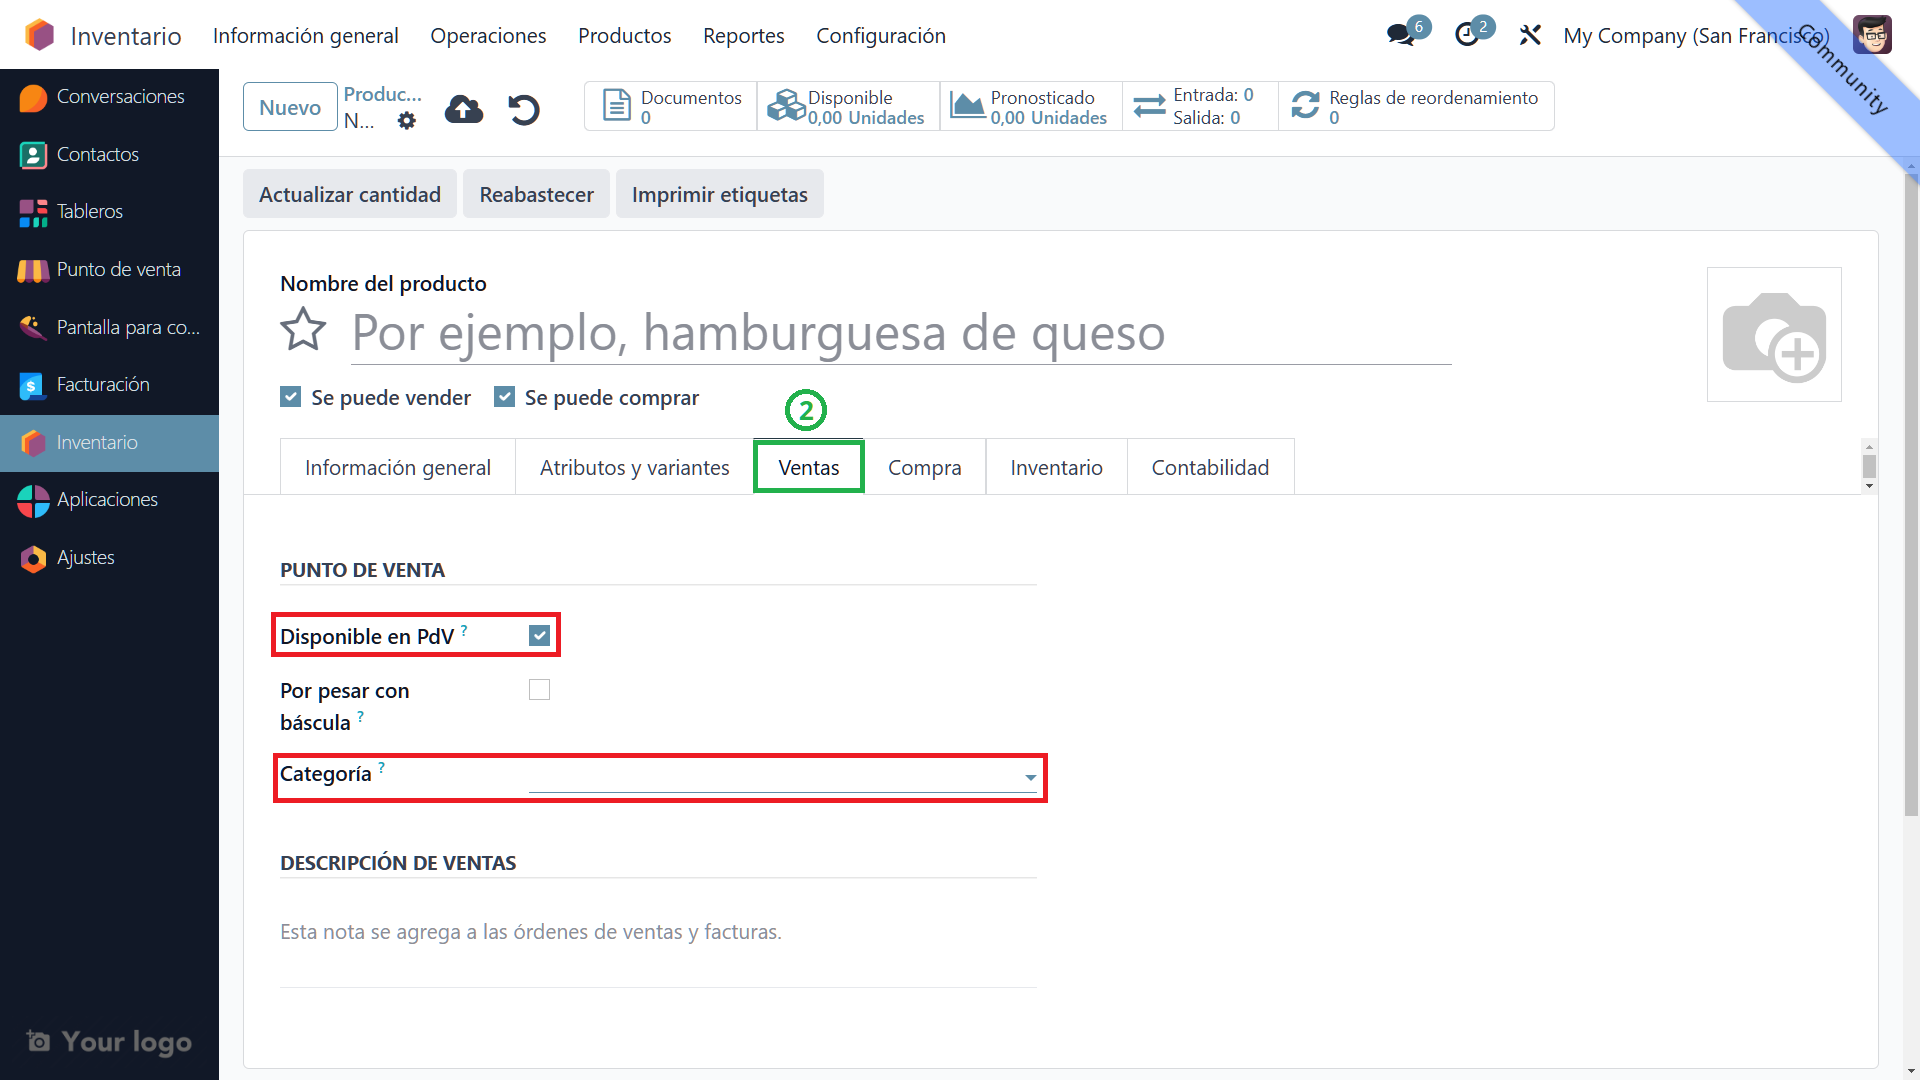
    5. The Sales tab 

    • Specify Point of Sale availability: Select this option if the product will be available in the Point of Sale interface.
    • Point of Sale category: Assign a category specifically for Point of Sale. This category is essential for displaying the product

    6. Save or discard 

    After completing all required fields, click "Save" to register the product. The cloud-shaped save button is at the top left. To cancel product creation, click "Discard", the circular button beside Save.

    You have successfully created a new storable product in Odoo 17!

    in V17 tutorials
    How to create a basic product
    TORRES PARRA DAVID FERNANDO September 24, 2024
    Share this post
    Tags
    Our blogs
    • Tutorials
    • V15 tutorials
    • News
    • Success stories
    • V17 tutorials
    Archive
    How to create a product with variants
    Learn to create a product with variants in Odoo 17 with our complete guide. Efficiently manage products with multiple versions and optimize inventory in Odoo.

    Odoo V15

    At eFixPro, we are pleased to offer a series of detailed Odoo v15 tutorials designed to help you get the most out of this powerful business management tool. Our blog is packed with useful resources covering a wide range of topics, from initial setup to advanced features.

    View tutorials

    Odoo V17

    We are excited to introduce our blog dedicated to Odoo v17 tutorials, the latest version of this outstanding business management platform. At eFixPro, we have created resources designed to help you discover and master the new features and improvements in Odoo v17.

    View tutorials
    EFixPro

    We transform businesses with Odoo ERP.

    Services
    • View all
    • Sales
    • Accounting
    • Inventory
    Company
    • About us
    • Success stories
    • Contact us
    Contact

    Calle 49 #49-11

    +57 604 2010998

    [email protected]

    Mon - Fri: 8:00 to 18:00

    © 2026 EFixPro S.A.S. — All rights reserved.
    Terms and conditions Privacy policy
    Powered by Odoo — The best open source eCommerce.